Last Minute Fathers Day ideas!

Forget the undies and handkerchiefs -
Get Dad a present he will use and love with his favourite Apple devices!!

4.Fitzroy_green3_1200x.png

How about a Waterproof Canvas Satchel for the active Dad to carry his devices?

2.Screen Shot 2020-09-03 at 1.23.18 pm.png

Or a quality Leather Case to carry his device to the office?

1.slim-folio-pro (1).png

Or an iPad case with a keyboard for something extra special??

Visit us in-store to see our huge range of Laptop and iPad covers, sleeves, satchels and backpacks.

iPad Workshop: Catch Those Memorable Moments

Welcome

Hi, my name is Tony I’m a technician here at Macs-4-U and below are the notes from the “memorable moments” workshop I ran in November 2019. If you didn't attend the workshop the notes may not be very helpful on their own so if you have questions about these notes or the workshop itself, please comment below or send me a direct email t.shannon@macs4u.com.au. So without further delay let’s jump into it!

Quick Camera and Camcorder

The quickest way to access the camera is actually from the lock screen, you can swipe the screen to the left to bring the camera up and you can start taking photos imminently. No need to put in a passcode or look for the camera application so if something is happening, for instance, the kids have just woken up and you want to capture that moment when they first see the presents under the tree you can quickly swipe to the right and start taking photos or swipe down to switch to taking videos. This is also handy if someone hands you their phone, and they forget to unlock it, now you know that you do not need their code just to take a photo.

Time-lapse

Another cool feature that I wanted to show you is “time-lapse” this is a great way to capture a long event in a style that’s fun to watch. To do this set up your device somewhere it won’t move around, switch to time-lapse mode and start filming. This is handy when you're setting up the Christmas tree or preparing a family dinner and you want to capture every moment without holding the camera in your hands the whole time. You can use time-lapse to speed things up but what if you wanted to slow things down?

Slow motion and sports mode

So what about the opposite? The kids just got a Nerf gun or everyone is about to jump in the pool, you might want to film those moments with more frames per second in order to catch every last detail. Using the slow motion mode or you can hold down on that camera button get a series of pictures in quick succession and pick the best ones later on.

Large group photos

If there are many people at your gatherings, you may have trouble fitting them all in one room let alone into one photo. Here you can use the panorama mode to take multiple photos that are stitched together automatically to make a big canvas. However, if you can fit everyone in to one frame, use the timer option in the camera mode.

IMG_5569D4454660-1.jpeg

Turn “Live Photos” into a video

Once you have taken some Live Photos, you may decide later that you want to turn them into a video. To do this select the Live Photos you want to combine into video, then select export and “save as video” the new video will be saved at the end of your camera roll.

Editing photos

When viewing a single photo, in the top right corner you will have a “Edit” option, select this option to get quick access to changing light, colour, adding a filter or cropping.

Using markup

Notice the 3 dots in the top right corner, this is how you open the photo in other editing apps like “Markup”

You can use the “Markup” tool to make text boxes, speech bubbles, write or draw on photos.

When you are finished with editing, click done to save your changes.

Sharing photos

Once you are happy with your edits you’ll probably want to share your work, you can do this by clicking the “share” button, this will bring up the “share menu” at the top of this menu is an “options” button. Use this to turn off locations and other metadata recorded in your photo, this is useful when posing a photo online where they will be seen by people you don’t know and if you don’t want them to know where the photo was taken.

Emailing photos

One share option in the list is the ability to send photos via email, this can be handy for sending 2 or 3 photos but any more in a single email however it may not send because the email will be too large. To change the size of an email tap on the subject where is says the email size, and there it gives you options to change the size of the photos. For instances where you are getting the photos printed out you may want to send them as “actual size” otherwise use large, medium or small to send a few photos at a time as a smaller email. Most email providers will send emails as long as they are under 4 MB (there are 1000 KB in 1 MB). So what if you want to send someone more photos than can fit in an email?

Shared albums

You can make your own shared albums by selecting “create a new album” and select “shared album”. It will ask you to give the album a title, then invite people to your shared album (you can leave this blank) and then you will be presented with the option to add a comment to the photos you are uploading then is done. If you look at albums on your device, you’ll find your shared album. In the top right corner you’ll see a “people” button, this is where you can find the settings to add or remove people from the shared album. This is also where you can give the people who have access permission to post their photos to your shared album. There is also an option there where you can make your album a public website and anyone with the link can view and make comments on your photos, like your own blog or social media site.

Slide show

When viewing an album, in the top right corner there is a “sideshow” button. Click that button to start a quick slide show of all the photos in that album. Tap the screen and then tap “options” to change the traditions, music and speed at which the photos change. Using shared albums you can turn almost any internet connected device into a digital photo frame simply by sending it the link to the shared album.

Conclusion

I hope this helps you make the most of this coming holiday season now that you know how to take, edit and share those memorable moments. Again if you have questions about these notes or the workshop itself, please comment below or send me a direct email t.shannon@macs4u.com.au.

How to make greeting cards, invitations and flyers on your Mac

57109960_10161723171595261_7864757367257169920_o.jpg

This guide will help you to make wonderful personalised greeting cards, invitations and flyers. Also, how separate apps on your Mac can be used together to create something new and unique.


Making Greeting cards using the Photos App and Mimeo Photos:

Step 1: Finding and selecting the photo(s) you want to use in your card.

photos-icon-100567302-orig.jpg
  • Open the “Photos” app on your Mac. If you are running Mac OS 10.11 El Capitan or earlier you may have iPhoto instead.

  • To find the photos you wish to use, try using the search tool built into photos. It can be used to find photos of almost anything; a specific person, or people, location, objects like “lake” or even an event — for example, a concert or wedding.

  • Once you have found your photo(s) or album, you can select and deselect multiple photos by holding down the “command” key as you click on them or holding down the shift key will select a whole block of photos.

Step 2: Choosing your Card design.

How to open Mimeo Photos.png
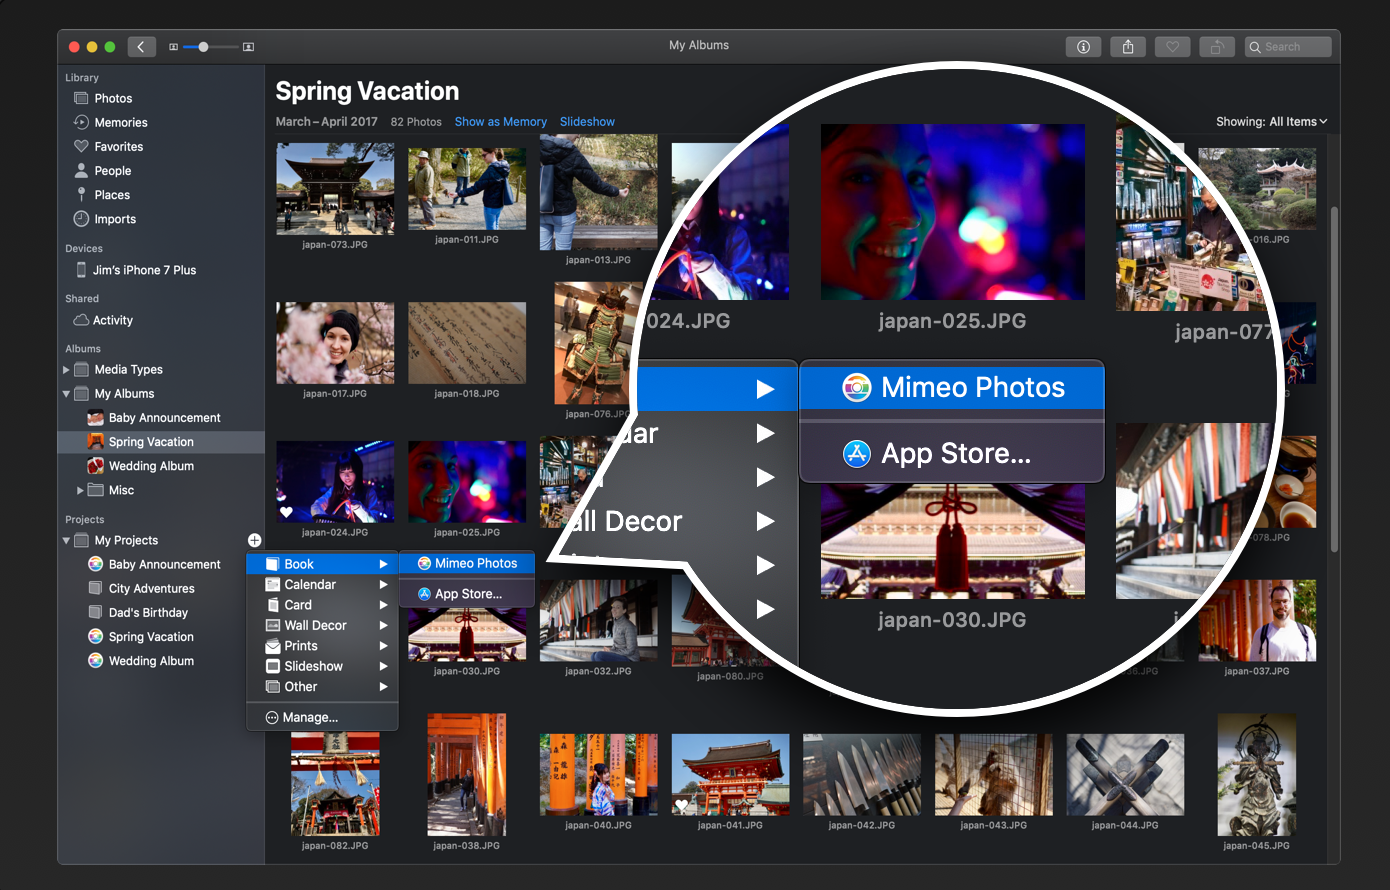
  • After the photo(s) you want to use are highlighted then select “File” > “Create” > “Card” from the menu at the top. 

  • Here you will need to install an extension app if you have not done so already.

  • Select “App Store” and it will present you with a few options to choose from, I like “Mimeo Photos” as they have a wide range of products, but other services are available.

  • Once “Mimeo” or your preferred app is on your mac and it is open, select the card you would like to make.

  • Now select a theme, this will determine the layout, fonts and colour palette of the card. Try to pick one with the same number of photos you intend to use. If you are not sure scroll to the bottom and select blank.

Step 3: Familiarise yourself with the program.

Screen-Shot-2018-10-09-at-22.27.03.png

Note: if you are using another extension other than “Mimeo Photos V3.1.1” the following may be different for you. It’s still worth taking a moment now to get a sense of how to use the app just so you know where everything is and what it does.

  • At the bottom of the screen, you can navigate between the different pages on the card.

  • On the right side, you can add or change photos, text, layout, background.

  • On the top you can access buttons that (from left to right) undo/redo, cut/copy/paste, theme/product, info/support, preview/edit, save and buy.

  • NOTE: Changing the “Theme” or “Product” can undo your work. I recommend duplicating the project first before using this feature. You can duplicate a project by right clicking it on the side bar and selecting duplicate.

  • You can add more photos to the project by selecting them and dragging them to the project on the sidebar.

Step 4: Making the card.

mimeo_and_mojave-1.png
  • Start by choosing a background colour, then the layout. Once you have a layout, you can add images by dragging and dropping them onto the card.

  • After adding images you can select them giving you the following capabilities:

    • Use the hand tool and zoom slider to position them in the frame.

    • Use the transform tool to move and resize the image on the page.

    • The edit tool to bring up the photo editor.

    • You can also quickly rotate and move the image to the front or back.

    • The “Background” button will make the image the background image.

    • And you can use the “Trash Can” to remove the image from the card without deleting it from your photos library.

  • Once you have your images in place, you can add text using the button on the right side.

  • To edit the text type in the white box what you would like it to say.

  • You can move and resize the text box with the “Transform” tool.

  • Clicking on the “A” symbol will give you more options for fonts, sizes, colour and layout.

  • If you find the text hard to read try giving it a coloured outline.

  • When you are happy with the card Tap the “preview” button, this will give you a mock-up of what the card will look like when you buy it.

  • If you would like more tips on how to use mimeo photos or the photos app check out their help pages:

    • Mimeo Photos Help: https://intercom.help/mimeo-photos

    • Photos App Help: https://support.apple.com/en-au/guide/photos/welcome/4.0/mac/10.14.4

Turn your greetings cards into invitations using preview:

Screen Shot 2019-04-18 at 5.04.02 pm.png
  • Follow the steps above to design your invitation. (Or make an invitation in any program like pages, see more in the flyers section)

  • Take a screenshot using the keys “cmd + shift + 4” this will give you cross hairs to draw a box around the card.

  • It will save an image of the card to your desktop, here you can open it in preview by right-clicking on the image and selecting “open with preview”.

  • You can open most documents, PDFs, and images in preview and it has simple yet versatile editing tools built right into it.

  • Click on the “show markup toolbar” (the marker in a circle) to get started.

    • There are “wand” tools to select all of one colour.

    • Pen tools for drawing and highlighting.

    • Shape and magnify tools.

    • The ability to add text boxes, signatures, and sticky notes.

    • The ability to adjust colour and the size of the image.

    • And tools to alter the style, colour and font of your text-boxes and shapes.

  • Most of these tools are not super useful for making invitations but know that they are at your disposal if you ever need to quickly mark up an image or document.

    • Once the invitation is satisfactory, you will want to print multiple copies of the same image and not necessarily in A4 size.

    • Open the “print” menu by using command+P or by selecting file>print from the top menu.

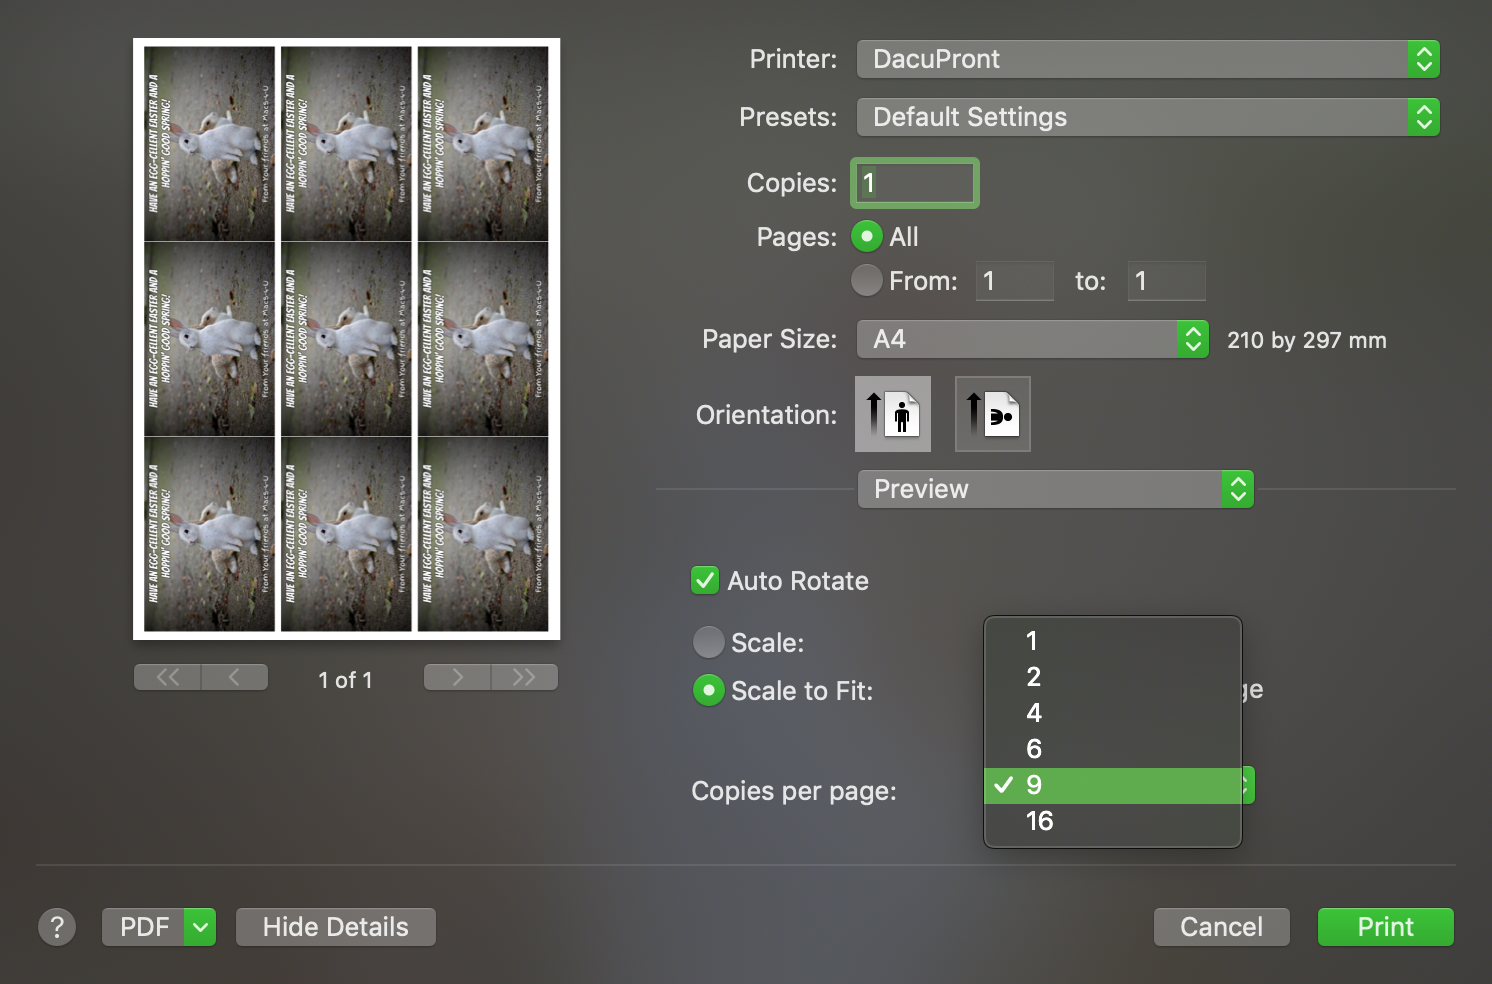
    • Use the “copies per page” drop-down menu to print multiples of the same image on one sheet of paper, then choose how many pages you would like to print. For example, if I need 8 invitations I could 4 copies per page and print 2 pages, saving both time and money

Let’s say this is a wedding invitation, and you wanted them to be printed professionally on individual pieces of cardboard but you don’t want to go through the hassle of doing that yourself. You could save this image and reopen it in the photos app, where you can open it with Mimeo Photos or another extension and have them print and mail out your wedding invitations for you.

If you would like more tips on how to use the preview app or markup check out their help pages:

If you are in the market for Flyers or Brochures, you can quickly make a design in pages.

Screen Shot 2019-04-18 at 5.07.58 pm.png

Step 1: Open a new pages document and check out the flyers and posters templates. (we can find Brochures under “miscellaneous”)

  • For this example, I will use the “tab flyer” template.

Step 2: Edit the text and images to suit your needs.

  • Click on a block of text to edit it. Use the format inspector on the right-hand side to change the style, font, colour, alignment and more.

  • To change the photo, you can drag and drop one from your computer or use the “media button” to select an image from the photos app.

  • The pull tabs on the bottom are just text boxes on a 90-degree angle, you can edit these individually or copy and paste them.

  • but you can do this quickly by using a table instead:

    • Edit one text box to resemble what you want, then move that box to one side.

    • Click and drag a box over the remaining text boxes and dividers to select them all, then press the delete key to remove them from the document.

    • Now insert a table and delete all but the first row, if you like add extra columns up to 8.

    • Move the table to the bottom of the page and resize it to take advantage of the space.

    • Copy your saved text box and paste it into the first column, you can now drag the yellow “auto-fill cells” circle to fill the remaining columns with the same text.

Once your flyer is finished you can print it by using command+P or by selecting file>print from the top menu.

Tip: Try using the PDF drop-down menu in the print window to “open in preview” to use tools I mentioned before or to print a few “mini” flyers on one page.

If you would like more tips on how to use the Pages app check out their help pages:

I hope this little guide has helped you realise how Photos, Preview and Pages can all be used to create personalised cards, invitations, flyers and brochures. Moreover, when they are used together what can be achieved by playing and experimenting with what tools each piece of software offers you. I look forward to seeing what unexpected things you create with the information you have gained today. An if you have some time I would greatly appreciate it if you could give Macs-4-U a review on any of these sites as it helps more people discover us: 

Facebook: www.facebook.com/macs4usales

Google: www.google.com.au/search?q=macs-4-u

Yelp: www.yelp.com.au/biz/macs-4-u-midland

ProductReview: www.productreview.com.au/listings/macs-4-u

Protecting Yourself Online

Guide for Safe Internet Usage

51730790_10161482318935261_4328599509857730560_o.jpg

This is a free guide and should not be relied upon to make financial or commercial decisions. If you have any questions about anything in these notes or topics discussed feel free to send me an email at t.shannon@macs4u.com.au or give us a call on (08) 9274 7111

Things you should be aware of; (I touch more on these subjects below)

1. Not everyone is who they say they are -  Phishing  Scams are attempts by scammers to trick you into giving out your personal information such as your bank account numbers, passwords and credit card details.

2. Fraudulent Websites - don't believe everything you read on the internet.

3. “Free” dose does not always mean “Free” - When it comes to downloads if you aren't looking for it you don't need it. If you need it, Make sure its what you want.

4. Password Management can be easy.

Phishing

What do I mean when I say “Not everyone is who they say they are” if you get a phone call from someone who claims to be your bank and they want to verify your Identity, how do you know you are speaking to your bank?  Phishing Scams - spelt with a “PH” rather than an “F” are attempts by scammers to trick you into giving out your personal information such as your bank account numbers, passwords and credit card details. Phishing can be done in many different ways, the kinds we see most are:

1. Unsolicited Phone Calls “We have detected a virus on your computer”

2. Emails that look like they are from a bank or delivery service.

3. Pop up adds

I will be going into ways on how to verify the source but you can save a lot of time and effort by going straight to the source. For example, if you get an email from Australia post saying they need to confirm your address to deliver a parcel, instead of replying to the email or click any links, simply go to Australia posts website and log in there. If the email was real you can confirm your address on the website directly instead of potently giving it to a 3rd party.

Same thing if you receive a phone call, ask them who they are, hang up and ring the real company.

What if you’re not sure about an email?

Fake Emails

Ways to identify if an email is fake:

1. You can look at the source. In apple mail you can do this by pressing “option+shift+U”

2. Note the return address. Is this who you expected the email to come from?

3. Check spelling or major grammar errors. Scammers will often use google translate to write emails and it results in incorrect spelling and grammar.

4. Anything that's “Free” that you didn’t ask for. You won the lottery and you didn’t even by a ticket? yeah sorry to say you didn’t.

So what do I do if I get a lot of spam emails?

What to do with Spam Emails?

1. Don’t respond in any way to unsolicited emails who's origin you don’t know. This includes “unsubscribing” as this tells the sender they have a “live one” on the end of their email trail.
2. Use a junk filter or Mail Rules. look for this in settings in your email app.

3. There are also apps that can block emails before they get to your inbox like getunsubscriber.com

So how do you know when I can trust a website with my personal info?

Website Certificates

Website Certificates

Check that there is a lock next to the website address before making online purchases or entering personal information. This indicates if the website is secure. If you are unsure of a website's legitimacy click the lock Symbol and check the country of origin and Date. Do this on websites you trust to get an understanding of how certificates should look. Certificates are widely used to secure electronic information.  For example, a certificate might allow you to sign email, encrypt a document, connect to a secure network, or identify yourself when using Messages.

But what about downloads?

Downlods

Downloads

Downloads can be tricky… 

Some websites get paid when people click on the ads so they make the ads appear like download buttons.

You can check when a download button is fake because they sometimes have the word "advisement" near them.

Often an ad blocker will help but some of these websites will ask you to disable it before they will give you access to the page.

When it comes to these types of websites its best to avoid them but you can use a “mouse rollover” technique to check where that link will take you. 

What if you accidentally downloaded the wrong thing?


Safari and other browser preferences

Once you’ve downloaded a file safari and other web browsers might be set to automatically open it. If it was an accidental click this could be what causes your Mac to get infected so its best to turn this setting off.

While you are in your safari settings you may want to change your “Autofill” preferences, especially if you let others use your Mac or you leave it unlocked.

Trojans

Trojans

Let’s say you managed to find the download you were looking for well your not out of the woods yet. 

A Trojan horse or Trojan is a type of malware that is often disguised as legitimate software. 

Trojans can be deployed by cyber-thieves and hackers trying to gain access to users' systems. 

If you find yourself with an adware infection you can try this tip…

Safe Mode

Here is a way to safely boot your Mac if you think it has an adware infection.

Simply restart your Mac while pressing and holding the “Shift key” immediately before you hear the startup tone.

Release the Shift key when the Apple logo appears. If done correctly Safe Boot appears on the Mac OS X startup screen.

Safe mode limits what is running in the background on your Mac, and it will allow you to use what you need to until you can bring the unit in for repairs.

But there are some infections that are not so easily fixed.


Ransomware

Ransomware is a type of malware that prevents or limits users from accessing their system.

This type of malware forces its victims to pay the ransom through certain online payment methods in order to grant access to their systems or to get their data back. Some ransomware encrypts files (called Crypto-locker) these are particularly difficult to remove but can be done without supporting the hackers who make them. 

One of the easiest was to safeguard yourself against such attacks is by having a good system backup. TimeMachine is probably the best backup program as it will allow you to restore to as little as an hour before the attack occurred. The more malicious of these Crypto locker programs can also encrypt external hard drives as well and if you are worried about that, you can use a network drive such as a Time capsule. 

So how do I avoid Ransomware?

Your mac is already protecting you

Accidentally installing Ransomware and other forms of malware on a mac has become exceedingly rare since the introduction of Gatekeeper in February 2015

Gatekeeper was a new feature in Mountain Lion using existing checks to help protect your Mac from malware and misbehaving apps downloaded from the Internet. But as always the safest and most reliable place to download and install new apps is via the Mac App Store.

So why am I bringing up Ransomware at all?

Fake “tech support”

I briefly mentioned this earlier but ransomware is most commonly install via a Phishing scam or fake “tech support” These cons are designed so you give someone else permission to install a program on your computer.

Most commonly it’s a pop-up add that says they have “detected” a virus on your computer and show a phone number you can call or scammers will call you out of the blue with the same claim.

Then they have someone guide you through installing a malicious program.

But fear not as you won't have compromised your computer until you give them “full access” That would require them to:

1. Have access to your computer - either over the internet or physically.

2. Know your administrator password - This is why it is important to have a strong password and not give it to other people.

So what can you do about popup ads?

Ad Blocker

Ad Blockers

You can download and install ad blockers for almost every browser including iOS devices, they will block most banner ads and pop ad ads and this will prevent most types of “fishing” scams.

Why not use an ad blocker all the time?

When viewing free media on the internet, the people who create that media get paid by the ads, using an ad blocker means that they don't get paid, if they don't get paid they stop creating media.  Some websites go as far as not letting you use them if you have an ad blocker turned on.  They can be easily turned off or you can use a secondary browser for those sites.

Password Managers

Password Managers

Complex passwords are difficult to remember, so you have probably defaulted to passwords like "password," "abc123," or your pet's name and other hacker-friendly naming conventions.

A password manager keeps all your passwords under one encrypted (and password-protected) roof. 

It generates strong passwords for you and automatically inserts them when you log into different sites. It can even store payment information to simplify online shopping.

These tools work on the principle that you create a master password for access to your identity vault, and then the password manager fills in individual user IDs and passwords for the sites and apps you use.

So What's the risk? All your passwords are in one place if a hacker gains access to your master password that would leave all your accounts open to plundering.

Unless you are using…

Two-step verification

Two-step verification

Two-step verification is a process that involves two authentication methods performed one after the other to verify that someone requesting access is who they are declared to be. 

Normally this is done by sending a once use code to your phone or email address.

By itself nether, your authentication code nor your password would give someone access to an account, only when they are used together.

To set it up simply look for the option on the website you wish to use it on, usually its under security settings once you log in.

VPN

VPN

Virtual private network or VPN 

A VPN creates a safe and encrypted connection over a less secure network, such as a public WiFi network.

Because your internet traffic is being put through another server it may be significantly slower than normal.

However, it will prevent your internet service provider from seeing what websites you visit. and it will keep you safe when using public wifi. It also stops websites from knowing your exact location*

If you are interested in trying a VPN try using “Psiphon” it is a free app and easy to use.

Thanks for taking the time to read this blog

As I mentioned at the beginning this is a free guide and should not be relied upon to make financial or commercial decisions and if you have any questions about anything in these notes or topics discussed feel free to send me an email at t.shannon@macs4u.com.au, give us a call on (08) 9274 7111 or comment below your favrout security tips. Also if you found this useful and have time I would greatly appreciate it if you could give Macs-4-U a review on any of these sites as it helps more people discover us: 

Facebook: www.facebook.com/macs4usales

Google: www.google.com.au/search?q=macs-4-u

Yelp: www.yelp.com.au/biz/macs-4-u-midland

ProductReview: www.productreview.com.au/listings/macs-4-u

Here are some other Helpful Programs and Websites to get you started

gmail.com or any other webmail service

scamnet.wa.gov.au - you can report scams on this website.

malwarebytes.org - you can use this free program to remove adware

avast.com - this free Security program will be enough for the average user

getadblock.com - AdBlock removes ads before you see them.

alternativeto.net - Crowdsourced software recommendations

getunsubscriber.com - The easiest way to stop unwanted email.